Nudges
Nudges are outbound messages generated by the PLuG widget to engage users and encourage specific actions or interactions. You can use these messages to gently prompt users, provide helpful information, or initiate conversations, thereby enhancing user engagement and guiding them toward desired outcomes within your application or website.
The PLuG widget can trigger these nudges and help you engage and interact with your customers more effectively.
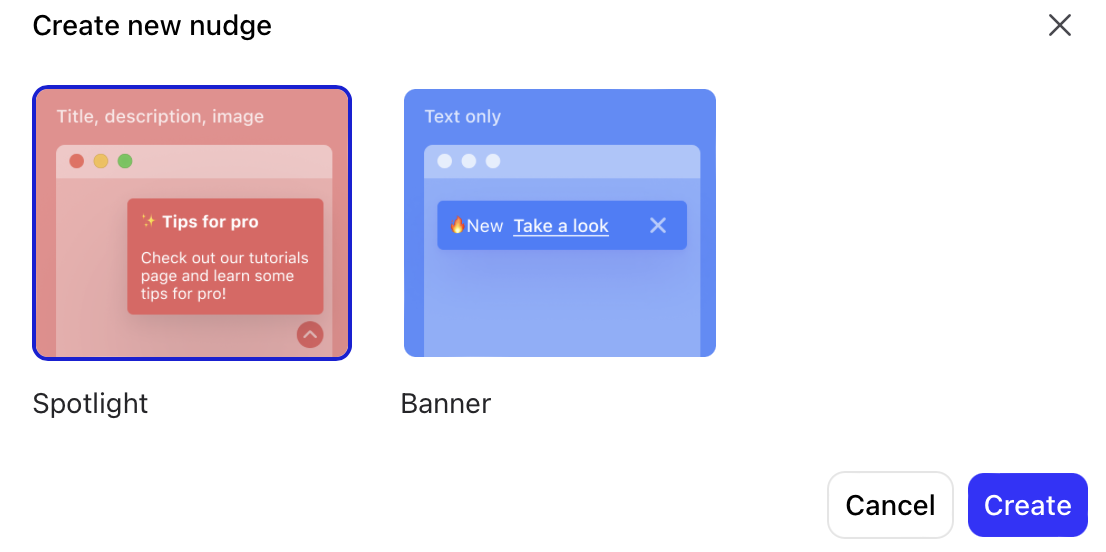
DevRev supports the following types of nudges:
- Spotlight
- Banner
Create a spotlight nudge
- Click Settings > PLuG Nudges.
- Click + Nudge.
- In the Create new nudge window, select Spotlight and click Create.
- In the Nudge Title field, enter the nudge name.
- In the Title field, enter the nudge title.
- In the Description field, enter the nudge description.
- In the Cover Image field, click Upload to upload an image.
- Use the Action drop-down menu to select the type of engagement you want your users to have when they click the nudge. The following types of action are supported:
- Redirect to URL: You can provide a URL that your customers are redirected to when clicking on a nudge. It's helpful for sharing release notes, news, or blogs with your customers.
- Open Widget: Upon clicking on the nudge, the PLuG widget opens to prompt the user to start a conversation. This is useful for informing customers about PLuG cards and suggesting support options.
- None: When the user clicks on the nudge, nothing happens and there won't be any interaction.
- Define rules as described in the Create rules section.
Create a banner
- Click Settings > PLuG Nudges.
- Click + Nudge.
- In the Create new nudge window, select Banner and click Create.
- In the Nudge Title field, enter the nudge name.
- In the Content field, enter the nudge title.
- To enable the nudge close button, turn on the Show a close button toggle.
- Select the banner color by clicking the color icon.
- Use the Action drop-down menu to select the type of engagement you want your users to have when they click the nudge. The following types of action are supported:
- Redirect to URL: You can provide a URL that your customers are redirected to when clicking on a nudge. It's helpful for sharing release notes, news, or blogs with your customers.
- Open Widget: Upon clicking on the nudge, the PLuG widget opens to prompt the user to start a conversation. This is useful for informing customers about PLuG cards and suggesting support options.
- None: When the user clicks on the nudge, nothing happens and there won't be any interaction.
- Define rules as described in the Create Rules section.
Create rules
The rules enable you to define when your customers should receive nudges.
- Click the Rules tab.
- If you want to send the nudge to the customer only when they end up on a specific URL on your website, you can use this setting. To add a page rule, click + Page rule and then add the URL. The URL can be an exact URL or a partial URL, depending on what you select between is/contains. If you want to send the nudge across all the URLs, you don't have to add a specific page rule. Click + Page rule again to add multiple URLs.
For PLuG to trigger the Nudge, your page URL should have the PLuG widget installed.
- If you want to send a nudge to your customer only after spending a certain amount of time on your website, you can specify a time in seconds. Leaving it blank sends the nudge immediately.
- You can define how frequently you want to send a nudge to a specific customer. Leaving it blank sends the nudge every time the user matches the rules you have set.
- To save your changes, click Save as draft, or to publish the nudge, click Publish. Your customers start seeing the nudge.